
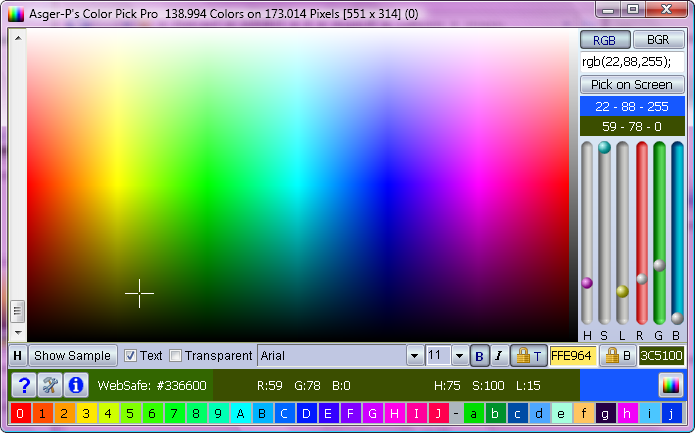

Color Pick Pro (CPP) is a professional tool, for finding the right
color, font or font color. CPP can store color sets to files and it can
copy any color value to the clipboard as a HTML hex value, C/C++ hex value, in
RGB, BGR, HSL, HLS and even
custom defined decimal or hex formats.
Color Pick Pro comes with a sizeable and zoom-able color picker cursor that can
fetch any color anywhere on the screen and it's 48 times in 16 steps zoom,
controlled with scroll or keyboard, makes it very easy to get exactly the right
color.
There is lots of color pickers out there, but the unique about this Color Picker
is that it provide a sample window you can drag to the place on the screen where
you need the color, font or font color. This feature makes it a lot easier to get
the font and color right. The Sample window can even be transparent, so you can chose
font and font color on the real background. Another thing that makes Color Pick
Pro stand out is that there is keyboard shortcuts for almost all functions in
the program.
For a full description of all the features in Color Pick Pro see the User Guide below.
Color Picker can run on Windows XP, Vista, 7, 8 and 10.
Color Picker is Trial Ware, so you have 30 days to try it before you decide to buy it. Price is: 12 USD
Current version: 3.3.5.21.


This is how the Title Bar looks when the Color Picker is not
being resized and the scroll bar isn't moved.
The first number you see 151,534 is the number of unique colors present in the
palette. The second number 192,509 is the number of pixels in the palette. The
third set of numbers [619 x 311] is the width and height of the palette and the
last number is the position of the scrollbar or should I say the gray value
mixed into the palette.
This is how the Title Bar looks when the Color Picker
is either being resized or the scrollbar is being moved.
The first number is just for show of, it tells you how fast all the colors in
the palette was calculated. The second set of numbers [619 x 311] is again the
width and height of the color palette and the last is again the position of the
scroll bar.
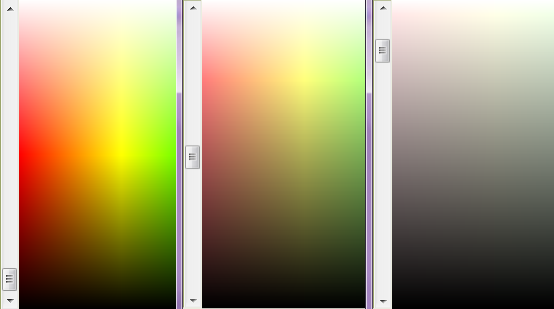
The three pictures at the left shows the effect of moving the scrollbar. At the left the scrollbar
position is 0 so all colors are bright. The middle image have a scrollbar
position of 125, which makes the colors more pastel. At the right the position
of the scrollbar is 220 and the colors are now almost gray, but still with some
coloring.
There is 255 positions (0-255) for the scrollbar and this gives you access
to all the rest of the full 24bit true color spectrum.
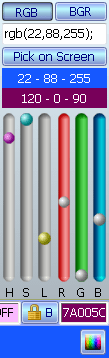
Here at the top we have two buttons,
![]() and
and
![]() that determine which color order is used
when parsing the values in the edit field
that determine which color order is used
when parsing the values in the edit field
![]() below. The edit field is where you can
type or paste color values you want to either save to a color set, translate to
another format or just want
to adjust. Color Pick Pro can understand these format:
below. The edit field is where you can
type or paste color values you want to either save to a color set, translate to
another format or just want
to adjust. Color Pick Pro can understand these format:
| HEX Values 0 - 9 and ( A - F or a - f ) | |
| $AA77FF | exactly $ + 6 hex characters (bgr) pascal |
| $00AAFF77 | exactly $ + 8 hex characters (bgr) pascal |
| #FFAA77 | exactly # + 6 hex characters (rgb) html |
| 0xFFAA77 | exactly 0x + 6 hex characters (bgr) C C++ |
| 0x00AAFF77 | exactly 0x + 8 hex characters (bgr) C C++ |
| FFAA77 | exactly 6 hex characters (rgb) |
| numbers only (0 - 9) | |
| rgb(0,255,125) | exactly rgb( + 1-3 numbers + , + 1-3 numbers + , + 1-3 numbers + ) |
| 255,0,125 | exactly 1-3 numbers + , + 1-3 numbers + , + 1-3 numbers |
| 255 0 125 | exactly 1-3 numbers + space + 1-3 numbers + space + 1-3 numbers |
Right below the edit you find the button
![]() that starts the
Picker, if you hold
down Ctrl or if you have set it to do so, in the right click
Popup Menu, the main window will
hide it self while you use the Picker.
that starts the
Picker, if you hold
down Ctrl or if you have set it to do so, in the right click
Popup Menu, the main window will
hide it self while you use the Picker.
The first color field below the
![]() button and the
color field at the bottom, correspond to the value in the edit field
button and the
color field at the bottom, correspond to the value in the edit field
![]() or the value you
have just picked. The next color field correspond with the value in the color
palette and it will change together with the Color Panel.
or the value you
have just picked. The next color field correspond with the value in the color
palette and it will change together with the Color Panel.
Next we have 6 sliders, the first three are for adjusting Hue, Saturation and
lightness / Lumination HSL, the next three are for adjusting
Red, Green and Blue RGB. The sliders can be moved with the
mouse or by using the up and down arrow keys. In order to use the keyboard the
slider must be active, to make a slider active you can either click on it or you
can use Ctrl + Shift + the corresponding letter shown at the
bottom of the slider.
Pressing: Ctrl + Shift + H will activate the Hue slider. If you
are a great fan of using the Tab key, you can also activate the
Hue slider using Ctrl + 1 and then use Tab and Shift
Tab to go back and forth between the sliders.
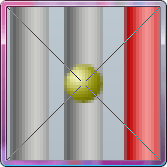
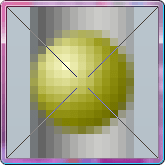
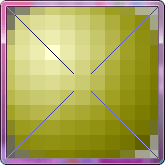
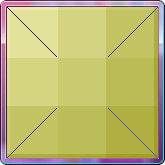
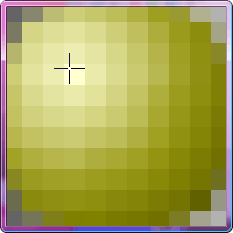
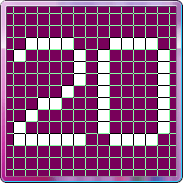
The Picker window have several features, the first I will describe is the 16 step 48 times live zoom, I call it live because it is very fast and so easy to use, with either the scroll wheel or the + and - key on the keyboard. Here below you see some snapshots of the zoom in action. The picker window replaces the standard cursor, so it will follow your mouse movements.
2 times zoom |
8 times zoom |
15 times zoom |
48 times zoom |
Sizing: If you hold down the Ctrl key while you scroll or use + and
- then it is the window size that change, as shown to the right. It will still have the same pixel in
center though, in other words, it doesn't move when resizing.
Picking: At the above images you see diagonal lines Pick Lines pointing to the center pixel
and when they are visible the pixel you select is the one in the center. You can
use the arrow keys to fine tune the window one pixel at the time, until you have
the right pixel at the center. Alternatively you can hold down the Shift
key, doing so, will lock the picker position and release the mouse as
a Cross Cursor, then you can click in any pixel anywhere inside the
picker window
to select.
Picking average: If you hold down Ctrl while
you either click or hit Enter you will get the
average color of all the of all the pixels shown in the picker.


Grid Lines: is also possible as you can see here to the left. To get those
lines you press G or activate them in the popup menu.
The Pick Lines can also be activated or deactivated as well, with the
key P or via the popup menu.
To the right you se the Color Hint window at the upper left
corner of the picker. The hint can show the values in both RGB
and in HSL and you can chose which by hitting H or clicking in the popup menu
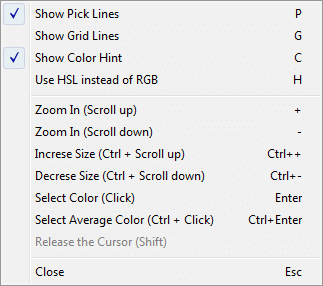
The right click Popup Menu I've been talking about can be seen here to the right and I don't think there is any need for further explanation except for the grayed Release the Cursor line which I only added as a helpful hint, it will always be grayed.

This button
 will turn
Hot Tracking on and of. When Hot Tracking is
on the button will be golden
will turn
Hot Tracking on and of. When Hot Tracking is
on the button will be golden

When Hot Tracking is on the shown color in the Color
Picker will change automatically to the color that is beneath the mouse
cursor, when yo move it over the Color Palette. This feature is
god when you want to find a color that looks nice compared to another color. If
you just want temporary Hot Tracking
you can hold down the Ctrl key when you move the mouse over the
Color Palette.
This part of the Color Pick Pro is used to control the appearance of the
Sample Window. The first button
![]() will either show
the Sample Window or hide it if it
is visible. The Sample Window is a window you can position
anywhere on the screen in order to see you choices of color and font where they
are going to be applyed.
will either show
the Sample Window or hide it if it
is visible. The Sample Window is a window you can position
anywhere on the screen in order to see you choices of color and font where they
are going to be applyed.
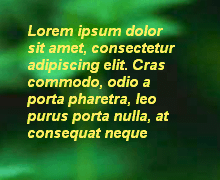
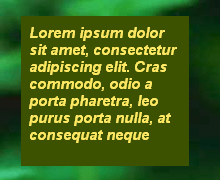
The two Check-boxes
![]() that comes
next determine whether or
not there should be text shown in the sample and whether or not the background
should be transparent, if there is text in the sample. This give you these three
ways of viewing the sample:
that comes
next determine whether or
not there should be text shown in the sample and whether or not the background
should be transparent, if there is text in the sample. This give you these three
ways of viewing the sample:
 |
 |
 |
Then we have the font settings for the sample and they are: First the name
![]() of the
font, then the size
of the
font, then the size
![]() of the font.
After that we have a button for Bold
of the font.
After that we have a button for Bold
![]() and one
for Italic
and one
for Italic
![]() . The font
you see in the sample is: Ariel, size 11 and it is both
Bold and Italic.
. The font
you see in the sample is: Ariel, size 11 and it is both
Bold and Italic.
At the right we have two buttons and two edit fields. The first set
![]() deals with the font color of the of the sample and the second
deals with the font color of the of the sample and the second
![]() deals with the background color of the sample. The way they work is that if you
activate the
deals with the background color of the sample. The way they work is that if you
activate the
![]() button
you lock the text color of the sample to the value in this
button
you lock the text color of the sample to the value in this
![]() edit field and if
you
activate the
edit field and if
you
activate the
![]() button
you lock the background color of the text sample to the value in this
button
you lock the background color of the text sample to the value in this
![]() edit field.
The color that isn't locked is the one changed by adjusting the color. To
change the color in the edits you can press F11 for the text color and
F12 for
the background color.
edit field.
The color that isn't locked is the one changed by adjusting the color. To
change the color in the edits you can press F11 for the text color and
F12 for
the background color.
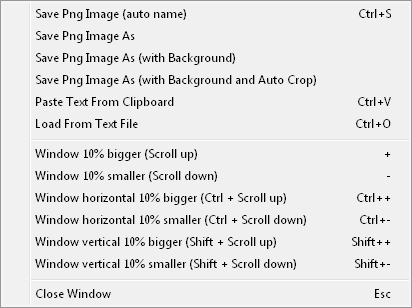
The Sample Window has its own Popup Menu that
you can see here at the right. This popup gives you options to save the sample
to a PNG file in four different ways:
Save Png Image (auto name): The first time you use this
function you will be asked to provide a path and a filename, unless you already
have used one of the Save As functions. The next time
Color Picker will add a number to the name and save the file to
the location you used the last time. If the sample have a transparent background
the PNG file will also be transparent and it will be cropped so
that the image is the same size as the text.
Save Png Image As: is the same as above, but you will always be
asked for a filename.
Save Png Image As (with background): Will save the background
as well even if the background is transparent in which case the the part of the
desktop that is seen in the Sample Window will be saved as the
background.
Save Png Image As (with Background and Auto Crop): This
function is for saving text with a colored background and only make the image
big enough to contain the text, in other words crop away all the empty
background. This is the function I used for making this little email image:
![]()
Paste Text From Clipboard: This gives you the opportunity to
replace the text in the sample with text you have copied to the clipboard. In
the main window popup menu there is an option, you can set if you want that the
text you paste from the clipboard should replace the text in the sample file as
well.
The rest of the Popup Menu shows how to resize the
Sample Window and I don't think explanation is needed.
Remember to take a look at the Keyboard Short
cuts at the bottom of this page.
This part of the Color Picker always show the active color or in other words the
color of the pixel beneath the cross cursor. As you can see it actually shows
three different colors. The color at the left is the "WebSafe" color
that come closest to the precise color. The next one to the right is the precise
color of the pixel beneath the cross cursor, the last one furthest to the right
match the one from below the input edit and it is here at the bottom for
comparison with the precise color.
There is also four buttons as you see three at the left side. If you click the
first button
![]() this web page will open in your browser. If you click the second
this web page will open in your browser. If you click the second
![]() a settings dialog will open, where you have some extra settings, but you can see all
about that a little further down this page under: Settings Dialog.
The third button
a settings dialog will open, where you have some extra settings, but you can see all
about that a little further down this page under: Settings Dialog.
The third button
![]() will lead you to information's about the Color Pickers version and how to
Register the application.
will lead you to information's about the Color Pickers version and how to
Register the application.
The last button
![]() furthest to
the right is for hiding and showing the Color Tuner panel.
furthest to
the right is for hiding and showing the Color Tuner panel.
At the bottom you can see this panel with all the different colors. The 20
colors at the left are User Colors and they are colors that you can set by pressing the
corresponding keyboard key + Alt, when
the desired color is in the Color Panel. The 10 colors at the right are
History Colors and they represent the 10
latest selections.
The first 20 colors represent one Color Set. Colors in a Color Set can be named, if you right click the color and chose
Set Color Hint from the pop up menu, the name you enter will then
show in the hint. When you chose to name a color You will get a very small
dialog as shown here below. You can also name the colors using the
Manage Color Sets dialog.

You can have as many different Color Sets as you like. This is particular useful when you work with colors on different projects, simply create a new Color Set for each project. The Color Set can then be loaded with a couple of clicks, using the right click menu, next time you work on the same project.
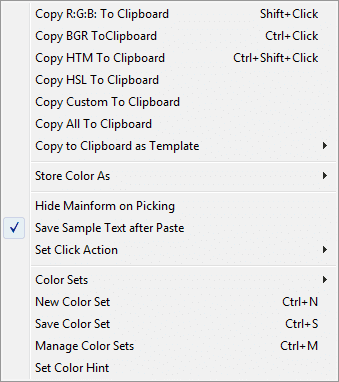
The first 6 items in this popup menu copy the color in the Color Panel to the
clipboard in various format, to see an explanation about the exact formats have
a look at Left Click Copy Setup.
The 7. Item
Copy to Clipboard as Template gives you access to a submenu
containing all your color templates.
Store Color As: gives you a
submenu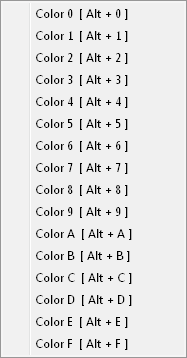 where you can chose to save the color in the Color Panel to one
of the 16 User Colors.
where you can chose to save the color in the Color Panel to one
of the 16 User Colors.
Hide Mainform on Picking: If you check this item the main
window will be minimized when you click the Pick on Screen
![]() button.
button.
Save Sample Text after Paste: If this one is checked the text
that you paste into the sample window will replace the text in the sample file
and will be the text in the sample the next time you use the sample.
Set Click Action: gives you this
submenu where you can chose which of the copy styles there will be used when you click
on a color. You can see much more about the different formats and their result
in Left Click Copy Setup section of this page.
where you can chose which of the copy styles there will be used when you click
on a color. You can see much more about the different formats and their result
in Left Click Copy Setup section of this page.
The last five items all deals with Color Sets. The first gives you a
submenu
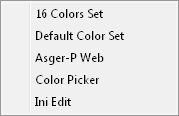 containing the Color Sets you have saved + two standard
Color Sets.
containing the Color Sets you have saved + two standard
Color Sets.
New Color Set: Give you a small dialog where you can provide a
name for the new Color Sets.
Save Color Set: Saves the 20 User Colors and their
hints / names to the Color Set file that is loaded.
Manage Color Sets: Opens the dialog You see described in the
next section .
Set Color Hint: This item is only visible when you right click
on a color in the User Color panel at the bottom and it Is described in the
Color Sets & Color History section.
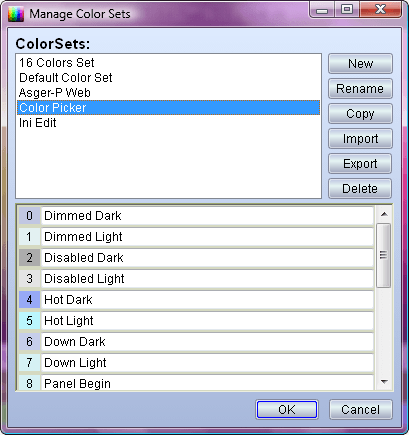
The top half of this Dialog is where you can manage your Color Sets. All
the six buttons relate to the Color Sets shown in the list view
and they do just what they say.
Import and Export
give you an way to share Color Set files with others.
Please note that Delete does not give a warning and there is no
way to undo a delete of a Color Set.
The two first Color Sets will always exist, yes you can delete them and that
will delete the corresponding file, but the file will be created again (as it
was the first time), next time you open the Color Set.
The bottom half of the dialog make it possible to set the name / hint for all
colors in the Color Set without right clicking a lot of times.

This is the Dialog you will see when you click this
![]() button.
button.
The top list shows all the available keyboard shortcuts and their action. you
can find the same list further down this page. It is well worth to have a look
at these shortcuts, as there is some functionality that can only be activated
using the keyboard.
Just below the Shortcut list, is an edit field where you can specify your own text file to be shown
in the Sample Window. You can either write a full path and filename or you can
click this
![]() button and browse to find the a file. If you have a filename in the edit field
or you just want to create one you can click the edit
button and browse to find the a file. If you have a filename in the edit field
or you just want to create one you can click the edit
![]() button, then the file will be opened in you default text editor. If there is a
non existing file in the edit field a file will be created with that name and if the edit
field is empty a file named sample.txt will be created in C:\Users\UserName\AppData\Roaming,
the file
will be opened in your default text editor and the filename will be added
to the edit field. The
button, then the file will be opened in you default text editor. If there is a
non existing file in the edit field a file will be created with that name and if the edit
field is empty a file named sample.txt will be created in C:\Users\UserName\AppData\Roaming,
the file
will be opened in your default text editor and the filename will be added
to the edit field. The
![]() that you see all to the left determine if the text that you paste into the
sample window,
will be saved to the file named in the edit.
The rest of this dialog will be explained in the next
sections.
that you see all to the left determine if the text that you paste into the
sample window,
will be saved to the file named in the edit.
The rest of this dialog will be explained in the next
sections.
This is where you can se what RGB template there is chosen to be the default for
customized output to the clipboard. You can make your own template or chose one
of the preinstalled templates by clicking this button
![]() If you do that you get to the RGB Template List.
If you do that you get to the RGB Template List.
The
output of what you see above will be: rgb(255, 255, 255); for the color white.
RR will be replaced with the red value, GG with the green and
BB the Blue. The CheckBox Hex tells you
whether the values will converted to Hex or to Decimal
values.
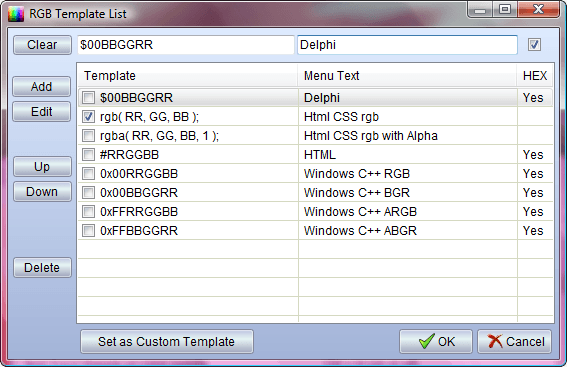
Here you see the RGB Template List where all the templates for creating RGB
color codes are stored. Color Pick Pro comes with 8 templates and common for all
of them is that they contain RR GG BB
the order can vary though. RR will be replaced with the red
value, GG will be replaced with the green value and BB
will be replaced with the blue value of the color.
If HEX is checked the
values will be inserted as two digits hex values from 00 to
FF. If HEX is not checked the values will be inserted as
decimal numbers from 0 to 255.
If you
notice there are two text parts to a template, the Template part is obvious, but
the Menu Text is not so obvious, it is there so you can give your template a
more readable name for when it is shown in the
Copy to Clipboard as
Template submenu.
You can set the default template either by double
clicking the template you want or by clicking the Set as Custom Template
button.
Here you choose what you want Color Picker to copy to the clipboard when you
left-click with the mouse on a color, I will explain these options from right to
left. Selecting
![]() is explained in the
previous section.
is explained in the
previous section.
 Is new in version 3 and if you select that one the color will be copied to the
clipboard as HSL values according to the HSL Setup.
Selecting
Is new in version 3 and if you select that one the color will be copied to the
clipboard as HSL values according to the HSL Setup.
Selecting
![]() will give you this: R:255 G:255 B:255 in the clipboard for the color white.
will give you this: R:255 G:255 B:255 in the clipboard for the color white.
![]() will give
you this:
0x00FFFFFF for white and this:
0x000000FF for red,
note that the red is the last value, this is often used in C and C++
programming. I you select
will give
you this:
0x00FFFFFF for white and this:
0x000000FF for red,
note that the red is the last value, this is often used in C and C++
programming. I you select
![]() the out put will be this:
#FFFFFF for white and
this: #FF0000 for red. Do you select
the out put will be this:
#FFFFFF for white and
this: #FF0000 for red. Do you select
![]() you get exactly that, one after the
other like this example for a color close to yellow:
you get exactly that, one after the
other like this example for a color close to yellow:
#E3E400 0x0000E4E3 R:227 G:228 B:0 hsl( 60, 100%, 44% ); rgb(227,228,0);
This setting can also be set in the Main Windows
Popup Menu.
Hue, Saturation and Lightness / Lumination HSL in short. In this section you
can see the template you have selected as default in the HSL Template List.
The edits and the checkbox are read only. If you want to edit or create new HSL
templates, you must use the HSL Template List
dialog and you get to that by clicking this button
![]() You can find a thorough explanation of the HSL template here
beolow.
You can find a thorough explanation of the HSL template here
beolow.
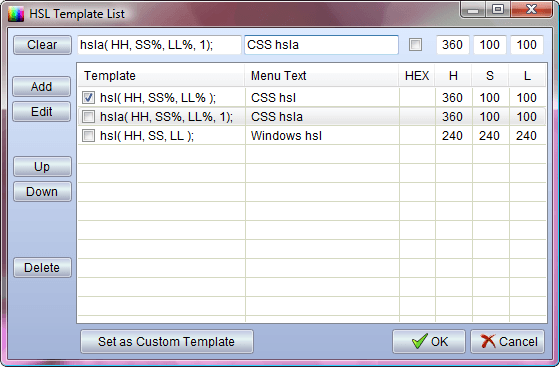
In this dialog you can see and edit the list of HSL Templates.
Color
Pick Pro comes with three HSL templates and common for
all templates is that they all contain HH, SS
and LL. When the template is used the HH will
be replaced with the Hue value, SS will be
replaced with the Saturation value and LL will
be replaced with the lumination value of the color.
The
HH, SS and LL will be
calculated according to their max values, which you set in the edit fields above
H, S and L.
The reason for
these max values is that HSL is not HSL, Hue, Sat and Lum can have any max value you can
think of, there don't seem to be a standard. Windows use 240, 240, 240. Paint Shop
Pro uses 255, 255, 255 and HTML/CSS uses 360, 100, 100. In other words these values
need to be set if you want to copy in HSL format.
The HEX checkbox determine if the HH,
SS, LL values will be replaced with HEX
numbers or (if not checked) decimal numbers. Menu Text is so
you can give the template a more readable text, for when it is show'n in the
Copy to Clipboard as Template submenu.
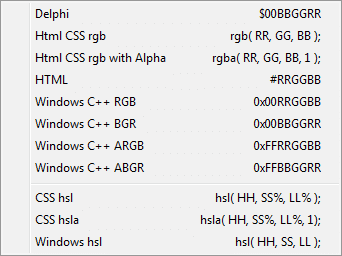
In this menu you have access to all your color templates, RGB at the top and HSL templates at the bottom. When you click one of the items the Color you have clicked will be send to the clipboard in the format specified by the template.
| Main Window: | |
| Select Color and send to Clipboard (as default) | Enter or Click |
| Color to Clipboard as R:G:B: Values | Shift + Left Click ** |
| Color to Clipboard as BGR Hex Values | Ctrl + Left Click ** |
| Color to Clipboard as HTML Hex Values | Ctrl + Shift + Left Click ** |
| Popup Menu | Right Click |
| To Get the Web Safe Color (** Add Alt Key) | Alt Key + Left Click |
| Hot Track mouse on color palette | Ctrl + H (on or off) |
| Color Picker 10 % Bigger | + (Shift = Vertical + or -) |
| Color Picker 10 % Smaller | - (Ctrl = Horizontal + or -) |
| Show the Help on the Web | F1 |
| Show the Settings dialog | F2 |
| Show the About Window | F3 |
| Show the Sample Window | Ctrl + Q (on or off) |
| Show Text in the Sample Window | Ctrl + T (on or off) |
| Transparent Background in Sample Window | Ctrl + A (on or off) |
| Scroll the Font List Up | Ctrl + Arrow Up |
| Scroll the Font List Down | Ctrl + Arrow Down |
| Scroll the Font Size List Up | Shift + Arrow Up |
| Scroll the Font Size List Down | Shift + Arrow Down |
| Bold Text in the Sample Window | Ctrl + B (on or off) |
| Italic Text in the Sample Window | Ctrl + I (on or off) |
| Lock the Sample Window Font Color | Ctrl + E |
| Lock the Sample Window Background Color | Ctrl + K |
| Set Sample Font Color | F11 |
| Set Sample Background Color | F12 |
| Set colors in 0, 1, 2 to F | Alt + 0, Alt + 2 to Alt + F |
| Move the Color Cursor (palette have focus) | Arrow Keys (alone) |
| Focus Color Palette | Ctrl + TAB |
| Focus Hue Slider | Ctrl + 1 |
| Focus Hue Slider | Ctrl + Shift + H |
| Focus Saturation Slider | Ctrl + Shift + S |
| Focus Lumination Slider | Ctrl + Shift + L |
| Focus Red Slider | Ctrl + Shift + R |
| Focus Green Slider | Ctrl + Shift + G |
| Focus Blue Slider | Ctrl + Shift + B |
| Select one of the 16 user colors 0, 1, 2 to F | Shift + 0, Shift + 1 to Shift + F |
| New Color Set | Ctrl + N |
| Save Color Set | Ctrl + S |
| Manage Color Sets | Ctrl + M |
| Close the Color Picker | Escape |
| Color Tuner: | |
| Set Color order to be Red Green Blue | Ctrl + R |
| Set Color order to be Blue Green Red | Ctrl + G |
| Paste a color value into the edit field | Ctrl + V |
| Opens the color picker tool (advanced eye dropper) | Ctrl + P |
| Color slide up (when focused, after click or tab) | Arrow up |
| Color slide down (when focused, after click or tab) | Arrow down |
| Color Picker Tool: | |
| Zoom In | + or Scroll up |
| Zoom Out | - or Scroll down |
| Window 10% bigger | Ctrl + + or Ctrl + Scroll up |
| Window 10% smaller | Ctrl + - or Ctrl + Scroll down |
| Free the cursor for picking | Shift |
| Select the color | Click or Enter |
| Select the average color of the whole Picker window | Ctrl + Click or Ctrl + Enter |
| Move the window horizontally | Arrow right and left |
| Move the window vertically | Arrow up and down |
| Show Gridlines | G (on or off) |
| Show Pickerlines | P (on or off) |
| Close the picker window | Escape |
| Sample Window: (when focused, click on the sample) | |
| Window 10% bigger | + or Scroll up |
| Window 10% smaller | - or Scroll down |
| Window horizontal 10% bigger | Ctrl + or Ctrl + Scroll up |
| Window horizontal 10% smaller | Ctrl - or Ctrl + Scroll down |
| Window vertical 10% bigger | Shift - or Shift + Scroll up |
| Window vertical 10% smaller | Shift - or Shift + Scroll down |
| Paste in new Text in Sample Window | Ctrl + V |
| Save Sample to File | Ctrl + S |
| Load new Sample Text from File | Ctrl + O |
| Popup menu | Right-Click |
| Close the window | Escape |
The maximum number of colors there can be viewed in the Color Palette at any given time is: 390.406 and that is achieved when the palette is 1537x512 pixels in size. There will not be more colors even if the Color Picker is maximized, it will just be easier to pick the right color. Please remember that this number have to be multiplied with 256 which is the number position in the scrollbar, this equals 99,943,936. which is way more then the actual maximum number of colors on a 24bit computer screen, that is by the way 16,777,216
Color Picker can also be used to see if a color monitor is capable of showing all the colors in the spectrum. If the monitor is good, you will, in a maximized Color Picker, see a very, very smooth rainbow pattern going from red to red. The big colors red green and blue will occupy equal space sepperated by the smaller colors yellow, turkeys and magenta. It is equally important that there is colors almost all the way to the top (white) and almost all the way to the bottom (black).

|

|

|

|

|

|
|
|

|


![]()
Last updated: Jun-28-2022
© Copyright 2003-2022 Asger-P Software
Contact:
![]()
This kind of program goes by many names: Color Picker, Color Selector, ColorSelect, Color Picker Pro, ColorPicker, ColorPal, Color Palette, ColorPalette, Color Select, Color Picker Professional, Color Tester, ColorTester, FontTester, Font Tester etc.